Table of Contents
Of all the trim work we do across Delaware County and the Main Line, wainscoting in older homes is the project type that most consistently tests a carpenter's depth of knowledge. Not because the installation itself is uniquely complex — it is not — but because the right answer in a home built in 1880 or 1920 is fundamentally different from the right answer in a home built in 1985 or 2010. In an older home, you are not adding wainscoting. You are restoring or extending a design language that the original builder put in place. Getting that wrong looks worse than not doing it at all.
This guide walks through what I look at before quoting a wainscoting project in a historic or older Delaware County home, how I match or complement original profiles, what materials I recommend and why, and what you should expect to spend in the Media, PA and Main Line market in 2026.
What Makes Delaware County's Older Homes Different
Delaware County's housing stock spans roughly 150 years of residential construction. The eastern townships — Haverford, Radnor, Springfield, the Borough of Media — include everything from late-Victorian single homes built in the 1880s and 1890s, through the Craftsman and Colonial Revival wave of the 1910s–1930s, through the post-war colonials and split-levels of the 1950s–1970s, up through the tract developments of the 1980s and 1990s. Each era has its own wainscoting vocabulary.
The late-Victorian and early-Craftsman homes typically had board-and-rail wainscoting — a raised panel below a chair rail, with the panels often running a full 36 to 42 inches high. The profile on the stiles and rails was often an ogee or ovolo edge — complex enough to be distinctive, simple enough to be producible in volume. Many of these original profiles still exist in the homes I work on, sometimes buried under paint, sometimes removed and replastered over.
The mid-century colonials — the ones that constitute the largest share of Delaware County's housing stock — had a different wainscoting tradition. When they had it at all, it was usually a simpler chair-rail-height flat panel or a picture-frame moulding applied to drywall. By the 1970s and 1980s, many builders skipped wainscoting entirely. So when a homeowner in Newtown Square or Springfield comes to me wanting to add wainscoting, the question is usually: are we restoring something original, extending something that exists in adjacent rooms, or introducing it fresh to a home that never had it?
All three answers lead to different scopes. Let me walk through each.
Newtown Square: Decorative Wall Paneling as a Modern Wainscoting Language
For a Delaware County home that never had traditional wainscoting — or where the original was removed — the cleanest modern interpretation of the wainscoting tradition is a decorative wall panel system using 1/4-inch MDF and primed trim stock. This is not a compromise. It is the standard approach for 1960s–1980s homes in the area, and when executed correctly with a spray finish, the result is indistinguishable from a traditional raised-panel installation at a fraction of the material cost.
Newtown Square Family Room — Decorative Wall Paneling (MDF System)
Before: A 1970s-era colonial family room with flat drywall surfaces and no trim differentiation on the walls. The room had no chair rail, no wainscoting, and no architectural detail below the crown line. The existing baseboards were outdated and mismatched.
After: Decorative wall panels installed using 1/4-inch MDF as the panel substrate, with primed 1×3 trim forming the frame around each panel section. The panel layout was planned to the room dimensions to achieve consistent spacing across all four walls. After installation, everything was filled, sanded, and spray-painted to a factory finish in a premium interior paint — the spray finish is what elevates this approach; brush-applied paint on MDF panel edges shows lap marks that a spray finish eliminates entirely.
Materials used: 1/4" MDF panels, primed 1×3 trim stock, premium interior paint (spray-applied).
Part of larger scope: This paneling was part of the Newtown Square family room renovation that also included custom crown moulding and custom cabinetry. Total project: ~$22,000 over 2 weeks, Delaware County, PA.
Note: No before/after photographs are published for this project. The above is a written narrative from project records.
The panel layout decision is something most carpenters underestimate. You are dividing a room into a grid of rectangles, and those rectangles will look right or wrong depending on how they relate to the room's windows, doors, and corners. The rules I follow: panels should not be narrower than their height (they look compressed), the last panel before a corner should not be a sliver, and window and door openings should ideally fall at a panel seam rather than bisecting a panel field.
In practice, this means I lay out the panel grid on paper before I touch the wall — measuring the actual room, locating every opening, and solving for a panel width that works across all four walls without forcing a bad corner. In older Delaware County homes with non-standard room widths (many of the colonials and split-levels were built on odd-dimension footprints), this takes longer than it does on a standard new-construction room. But it is the difference between wainscoting that looks designed and wainscoting that looks applied.
One more thing specific to plaster walls: I always check the wall surface for previous patch work before marking out the panel grid. A plaster patch from a removed outlet or a repaired crack can telegraph through even 1/4-inch MDF if the adhesive bridges it unevenly. I skim those spots level before the panels go up.
King of Prussia: Wainscoting as Part of a Large-Scale Renovation
Not all wainscoting projects stand alone. One of the largest scopes in our project history that included significant wainscoting work was a full basement renovation in King of Prussia — a project that encompassed baseboards, picture-frame moulding, and extensive custom trim work throughout, including a hidden trim-integrated door as a feature element.
King of Prussia Basement — Baseboards, Picture-Frame Moulding & Custom Trim Throughout
Scope: Full basement renovation including baseboards throughout, picture-frame moulding wainscoting on the primary wall runs, extensive custom trim detailing, and a hidden door integrated into the trim scheme — the door is concealed by continuing the picture-frame moulding across its face so it reads as a wall panel rather than an entrance.
Project scope: ~$100,000 | Timeline: 2 months | Location: King of Prussia, Montgomery County, PA (ProBrothers regional service area)
Note: No before/after photographs are published for this project. The above is a written narrative from project records.
The hidden door detail is worth explaining because it illustrates what extensive trim work can accomplish beyond pure decoration. A picture-frame moulding system applied consistently to all four walls creates a visual field of identical panels. A door within that field — if framed and hinged to the same dimensions as the surrounding panels and trimmed identically on its face — disappears into the pattern. The eye reads it as wall, not as door. The trim is doing structural visual work, not decorative work.
What Delaware County Homeowners Have Said About Our Wainscoting Work
Our trim service page includes a review from a Delaware County client that captures the everyday end of wainscoting work — not a whole-home renovation, but a hallway update that transformed the space:
"We had them update the baseboards and add wainscoting to our hallway. It totally modernized the space. The crew was quiet, clean, and got it done exactly on the schedule they promised."
— David Harris
This kind of scope — baseboard replacement plus hallway wainscoting — is one of the most cost-effective trim projects we do. The hallway is the first interior space a visitor sees. Wainscoting there changes the character of the entire ground floor even if no other room is touched.
We also see wainscoting requests frequently in Kennett Square, where the older stone and colonial-style homes in Chester County often have original chair-rail systems that need restoration or extension. Our Kennett Square location page notes a completed project there: a full kitchen remodel that also included "restored chair-rail and wainscoting trim throughout the first floor" — an example of how wainscoting restoration often travels with a larger renovation scope when the original detailing exists in the home.
Our Published Staircase Wall Paneling Portfolio
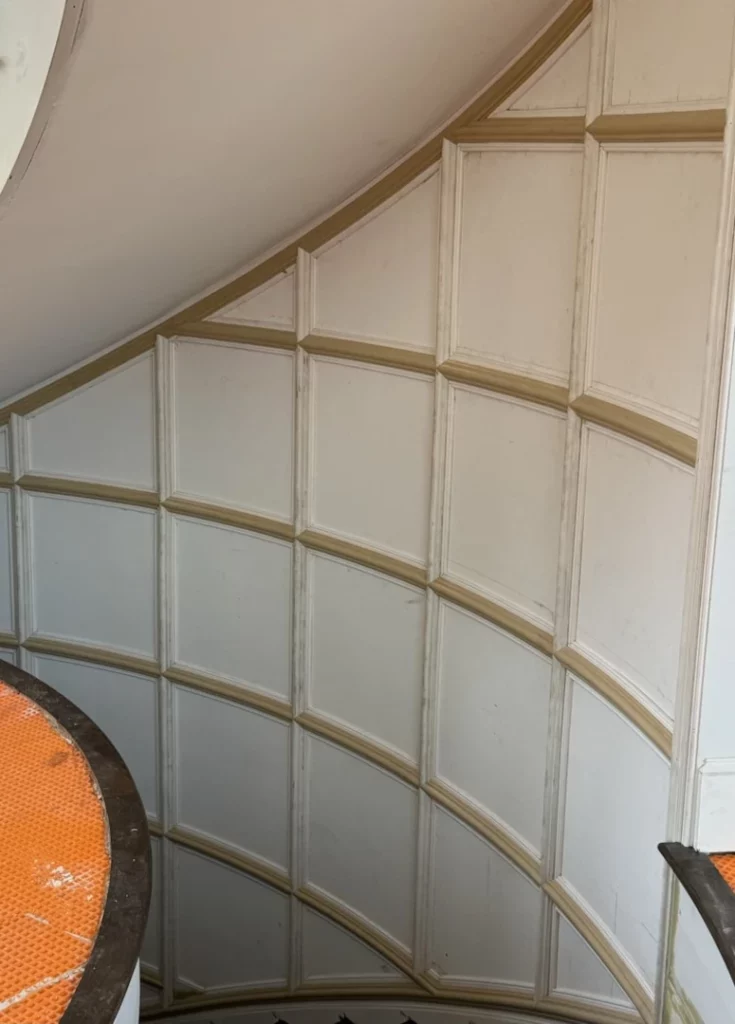
Two of the most compelling wainscoting-adjacent installations in our trim project portfolio are curved and straight staircase wall paneling — the technique most directly related to wainscoting applied to a non-flat surface:
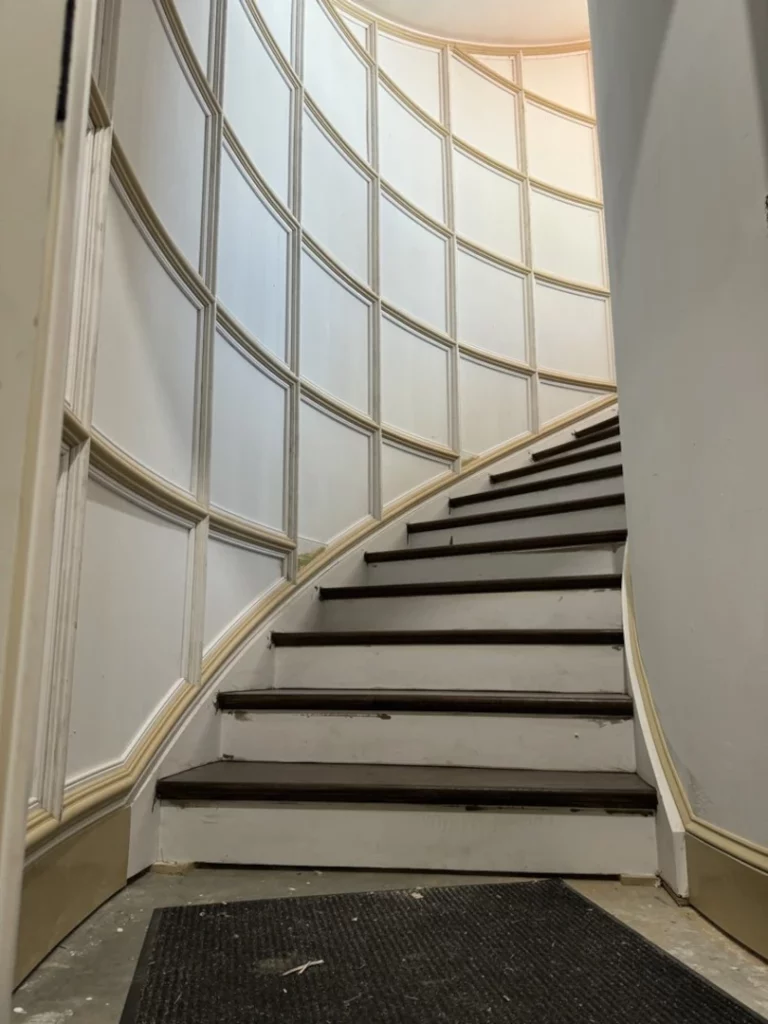
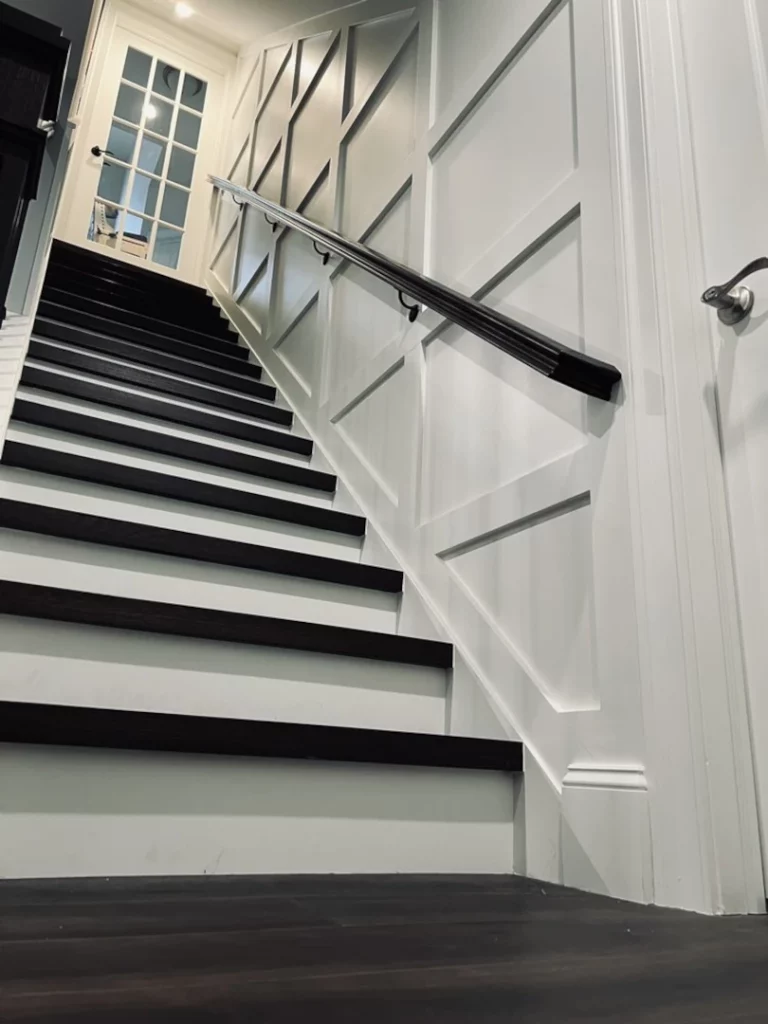
The Stairs project is instructive because it was a genuinely complex installation: curved staircase, new home in Delaware, trim paneling on a non-straight wall surface. Standard trim cannot be bent to follow a curve — it either needs to be flexible trim stock or needs to be built up from short sections that follow the curve incrementally, with each section's cut angle adjusted for the wall's arc. We used lasers and levels to keep the horizontal rails visually level even as the wall curved, which is the part of this install that looked complicated in practice. The White Stairs project is the more common residential scope: a straight staircase wall, basement space, trim installed on an existing wall and painted to an elegant finish. The principle is the same as wainscoting in a hallway — the trim creates a visual field on the lower wall, defines the space, and gives the staircase a finished quality that flat drywall cannot.
Matching Original Profiles in Older Delaware County Homes
When a historic home in Haverford or Media or the Radnor townships has existing wainscoting in one room and the owner wants to extend it to adjacent rooms, profile matching is the central challenge. Original profiles from the 1880s–1930s were produced on custom shop-run cutters that no longer exist. The specific ogee, ovolo, or bead profiles in a Victorian-era colonial may not correspond exactly to any current stock profile.
There are three approaches, and I use all three depending on the situation:
- Stock matching: Bring a sample section of the original profile to the hardwood dealer and compare it against every stock profile in their library. In roughly 40% of the cases I have dealt with, a close match — within an eighth of an inch on the major profile elements — exists in stock. Close is not identical, but in an adjacent room where the two profiles never appear within the same sightline, close is acceptable.
- Custom milling: A local millwork shop can run a custom profile from a sample. You get an exact match at the cost of a setup fee plus a minimum order quantity — typically 100 linear feet or more. This is the right answer when the original profile is in the same room as the new work, or when the owner cares deeply about historical accuracy.
- Complementary profile, not matching: In some cases, the original profile is too complex or too expensive to match, and the better decision is to choose a current profile that is compatible in spirit — same period vocabulary, similar scale — without attempting to be identical. This requires confidence from the carpenter, because you have to be able to explain the decision and make it look intentional rather than like a failure to match. When done well, it is the most honest approach: you are not pretending the new work is original.
The material substrate for historic matching follows the same logic. Original Victorian and Colonial Revival wainscoting used solid wood — typically poplar for painted work (affordable, smooth, takes paint well), pine in older homes, or oak if left natural. Current stock material options include solid wood (still available, still the premium choice for painted or stained wainscoting), MDF (the standard for contemporary painted wainscoting — dimensionally stable, no grain telegraphing, takes paint beautifully), and MDF with veneer faces (for stained applications where the look of wood grain matters but dimensional stability is a priority).
Wainscoting Cost in Media and Delaware County — 2026 Market Rates
The range I quote most often for Delaware County residential wainscoting is $8–$18 per linear foot installed, labor only — but that spread is wide enough to be misleading without context. Here is how I break it down:
| Type / Scope | Budget | Mid-Range | Premium |
|---|---|---|---|
| Chair rail only (standard room, drywall walls) | $3–$5 / linear ft | $5–$7 / linear ft | $7–$10 / linear ft |
| Picture-frame moulding wainscoting (MDF panels, drywall substrate) | $8–$11 / linear ft | $11–$14 / linear ft | $14–$18 / linear ft |
| Raised panel wainscoting, stock profiles (solid wood or MDF) | $12–$16 / linear ft | $16–$22 / linear ft | $22–$30+ / linear ft |
| Historic profile matching (custom milling, plaster substrate) | Add $4–$8 / linear ft over raised panel rates for profile milling + plaster prep | ||
| Full hallway wainscoting (typical 12–20 linear ft, includes chair rail + baseboard) | $900–$1,500 | $1,500–$2,500 | $2,500–$4,000+ |
Ranges reflect Delaware County / Philadelphia metro market rates, 2026. Labor only unless noted. Materials (MDF, trim profiles, primer, paint) are additional. Source: ProBrothers project cost records and Remodeling Magazine Cost vs. Value Report, Philadelphia metro edition.
A typical Delaware County hallway — roughly 16 linear feet of wall run — with picture-frame moulding wainscoting at mid-range rates is a $1,600–$2,200 project, labor only, before materials and paint. Add materials and a quality paint finish, and a hallway installation is a $2,200–$3,500 all-in project. The David Harris hallway project referenced above falls within this range. The Newtown Square family room paneling — part of a larger $22,000 scope — was at the higher end because the panel layout work, fill, and spray finish on a full four-wall family room is meaningfully more labor than a standard hallway.
Installing Wainscoting on Plaster Walls — Delaware County Specifics
Wainscoting installation on plaster walls — common in Delaware County homes built before 1960 — requires different technique than drywall installation. The key differences: (1) Fasteners must be located to hit lath strips, or the plaster surface will crack around the fastener hole. We use a combination of construction adhesive and fasteners placed at identified lath locations. (2) Plaster walls are rarely perfectly flat. A skim coat over any high spots before the panels go up prevents telegraph through the MDF or solid wood. (3) Plaster absorbs moisture differently than drywall, so the wood or MDF against it may move seasonally. We use flexible adhesives and leave micro-gaps at the wall junction rather than hard-seating the panels, which allows for movement without cracking the finish.
For historic restoration on plaster walls — particularly in the Victorian and Colonial Revival homes in Haverford and Radnor townships — we also check the existing plaster depth before selecting panel thickness. Original plaster lath builds up a surface that may be 5/8 to 3/4 inch proud of the stud face, which affects how the wainscoting aligns with the existing baseboard and any door or window casings it meets.
None of these plaster-specific considerations should deter a Delaware County homeowner from wainscoting their older home. They simply explain why an installer who has worked exclusively on drywall new-construction may not be the right choice for a 1910 colonial in Wayne or a 1920s bungalow in Swarthmore. The work requires experience with the specific substrate — not because plaster is impossible, but because it rewards attention to detail that many newer-market carpenters have never developed.
Wainscoting Heights — What Works in Different Room Types
Wainscoting height is not arbitrary — it is proportional to the room's ceiling height and architectural period, and getting it wrong is visually jarring even when the installation itself is perfect. Here are the rules I follow:
- Traditional chair-rail height (32–36 inches): The standard for Colonial Revival and post-war colonials in Delaware County. The chair rail marks the height at which a dining chair back contacts the wall — it was originally a functional protection, and the decorative wainscoting below it followed logically. In rooms with 8-foot ceilings, this height keeps the lower wall from feeling cramped.
- Mid-height wainscoting (42–48 inches): More common in Victorian-era homes with 9- or 10-foot ceilings. At this height, the wainscoting provides a more substantial architectural anchor to the room. It is also the height typically expected when matching an existing Victorian original. In a room with 8-foot ceilings, this height can feel top-heavy — the wainscoting takes up more than half the wall.
- Waist-height or contemporary panel systems (54–60 inches, or 2/3 of wall height): More of a contemporary interpretation than a historic one. Works in transitional homes where the design brief is modern character in an older shell — but does not fit when matching a period original.
- Full-height wainscoting (to ceiling): Not wainscoting in the traditional sense — this is a full wall treatment. In a historic home, this is usually the Blue Library approach: built-in shelving or cabinetry as a continuous wall system, not a decorative trim program.
Frequently Asked Questions — Wainscoting in Delaware County
How much does wainscoting installation cost in Media, PA?
A typical hallway in a Delaware County home — 12–20 linear feet, picture-frame moulding style — runs $1,500–$3,500 all-in for labor and materials with a quality paint finish. A full family room or dining room wainscoting project at mid-range rates is $3,000–$6,000+. Historic profile matching on plaster walls adds $4–$8 per linear foot over standard rates. Our Newtown Square family room decorative panel package was part of a $22,000 scope that included crown and custom cabinetry.
Can you match the original wainscoting profile in my older Delaware County home?
Usually, yes — through one of three approaches: stock profile matching (works in ~40% of cases), custom milling from a sample (exact match, higher cost), or a complementary period-compatible profile (the right choice when the originals are in different rooms). Bring us a sample of the existing profile and we will assess the options on-site.
Does wainscoting work on plaster walls in older Delaware County homes?
Yes. Plaster wall installation requires additional prep — skimming high spots, using construction adhesive plus fasteners placed at lath locations, and allowing for seasonal movement — but we do it regularly in Haverford, Radnor, and Media township homes. The installation holds and finishes as well as drywall when the prep is done correctly.
How high should wainscoting be in a colonial-style Delaware County home?
For a standard 8-foot-ceiling colonial — the most common home type in Delaware County — chair-rail height (32–36 inches) is the historically correct and visually proportionate choice. 42-inch height is appropriate for homes with 9+ foot ceilings, which is common in the Victorian and Colonial Revival-era homes in the eastern townships.
What is the difference between picture-frame moulding wainscoting and raised panel wainscoting?
Picture-frame moulding wainscoting applies a frame of flat or profiled trim to the wall surface, creating the visual pattern without removing material from the wall plane — the panel field is the wall itself. Raised panel wainscoting uses actual raised or recessed panels set into a stile-and-rail frame, creating dimensional depth. Raised panel is the traditional high-end option and matches Victorian-era originals; picture-frame is the standard approach for painted modern wainscoting in post-war homes and is cost-effective and durable when properly executed in MDF.
Do you install wainscoting in hallways and on staircase walls?
Yes — these are two of our most common scopes. Hallway wainscoting was part of the David Harris project on our trim service page; staircase wall paneling on curved surfaces is shown in our Stairs portfolio project (Delaware new-construction, curved staircase, special flexible trim stock). Staircase wainscoting requires more layout time than flat-wall work but follows the same principle: a defined visual field on the lower wall, carefully leveled horizontal rails even as the grade changes.
Do I need a permit to install wainscoting in Pennsylvania?
Decorative wainscoting on existing walls does not require a permit under the PA Uniform Construction Code (73 Pa. Stat. § 517.1). If the project involves structural changes or is part of a larger renovation with a permit, the trim work is covered under that permit. We handle permit applications for any scope that requires one — homeowners do not need to manage this themselves.
From Our Work: Matching Profiles in a Historic Home
A client in Wallingford wanted wainscoting to match the original millwork in her 1910 farmhouse's front hall, but the exact profile was long out of production. We had a custom knife ground to match the original panel-and-rail dimensions rather than substituting a close modern equivalent. It cost more and took longer, but the new sections are indistinguishable from the century-old originals — which is the only bar that matters on historic trim work.
Ready to Add Wainscoting to Your Delaware County Home?
ProBrothers serves Media, Newtown Square, Haverford, Springfield, West Chester, Kennett Square, and surrounding communities. Free quote within one business day. 5.0 rating · 15+ years · 135+ projects. ProBrothers is a licensed and insured Pennsylvania general contractor — PA HIC# 195591.