
| Detail | Value |
|---|---|
| Location | West Chester, PA (Chester County) |
| Service | Kitchen Range Hood Enclosure, Tile & Crown Moulding Installation |
| Budget | $10,000 |
| Timeline | 3 days |
| Crew | Marsel, James, Alex |
Overview
This kitchen improvement project in West Chester, Chester County, focused on upgrading the cooking area while maintaining the home's existing design aesthetic. The homeowner wanted to replace an outdated range and the cabinet housing around it, while extending the backsplash to create a cleaner, more modern appearance — without requiring a complete kitchen remodel.
ProBrothers' crew — Marsel, James, and Alex — approached the job with a clear mandate: seamlessly integrate the new elements with the existing cabinetry, countertops, and tile finishes so that the renovation looked like part of the home's original construction. Three days. No disruption to the rest of the kitchen. No visible seam between old and new.
The Client's Goal
The homeowners in West Chester had a kitchen that was functionally complete and visually well-finished in most areas: white raised-panel cabinetry, a clean layout, and a stainless double wall oven. The weak point was the range position.
The previous range had been removed and the cabinet housing around the duct cavity had never been properly resolved. What remained was an open drywall cavity with an exposed vent duct stub coming through the ceiling. The surrounding backsplash tile did not extend up to meet the duct opening, and there was no soffit or crown to cap the cabinetry run above. In an otherwise polished kitchen, this one area looked unfinished.
The goal was precise: close the duct cavity, house the new range hood inside a built-in enclosure that matched the surrounding cabinetry, extend the existing tile all the way to the ceiling, and tie the whole run together with crown moulding — all without touching or disrupting the existing finishes anywhere else in the room.
Scope of Work
- Protected existing countertops, appliances, and flooring before any demolition started.
- Removed the old kitchen range and the remnant cabinetry around the duct cavity.
- Repaired the exposed drywall and prepared the surface for tile installation.
- Installed matching backsplash tile from countertop level all the way to the ceiling.
- Built and installed a custom soffit above the cabinetry to house the new range hood.
- Installed crown moulding across the top of the full cabinet run and soffit enclosure.
- Applied color-matched grout across all new tile for seamless visual continuity.
- Installed, wired, and tested the new kitchen range.
- Completed paint touch-ups on surrounding walls and ceiling, then did a full site cleanup.
Step-by-Step Process
Phase 1 — Surface Protection and Demolition
The first thing Marsel's team did before any tools came out was protect everything that was staying. Countertops were covered, the double wall oven and adjacent appliances were shielded, and the flooring was fully protected. This is not a courtesy step — it is how a professional job stays a professional job. When the demo crew works around existing finishes, zero tolerance for damage is the standard.
With protection in place, the old range and the remnant cabinet framing around the duct cavity were removed. The exposed drywall was inspected: areas of damage were cut back cleanly, patched with new material, and taped, mudded, and sanded to create a flat, paint-ready surface. Tile does not hide wall defects — every imperfection in the substrate telegraphs through the adhesive and into the finished tile surface — so this prep phase is not rushed.
Phase 2 — Tile Installation (Counter to Ceiling)
Matching the existing backsplash was identified in the project brief as one of the most important aspects of the work. The homeowners already had grey subway tile throughout the kitchen backsplash area. The new tile had to blend perfectly with the original — same size, same profile, same grout joint spacing — so the extension read as seamless rather than as a visible patch.
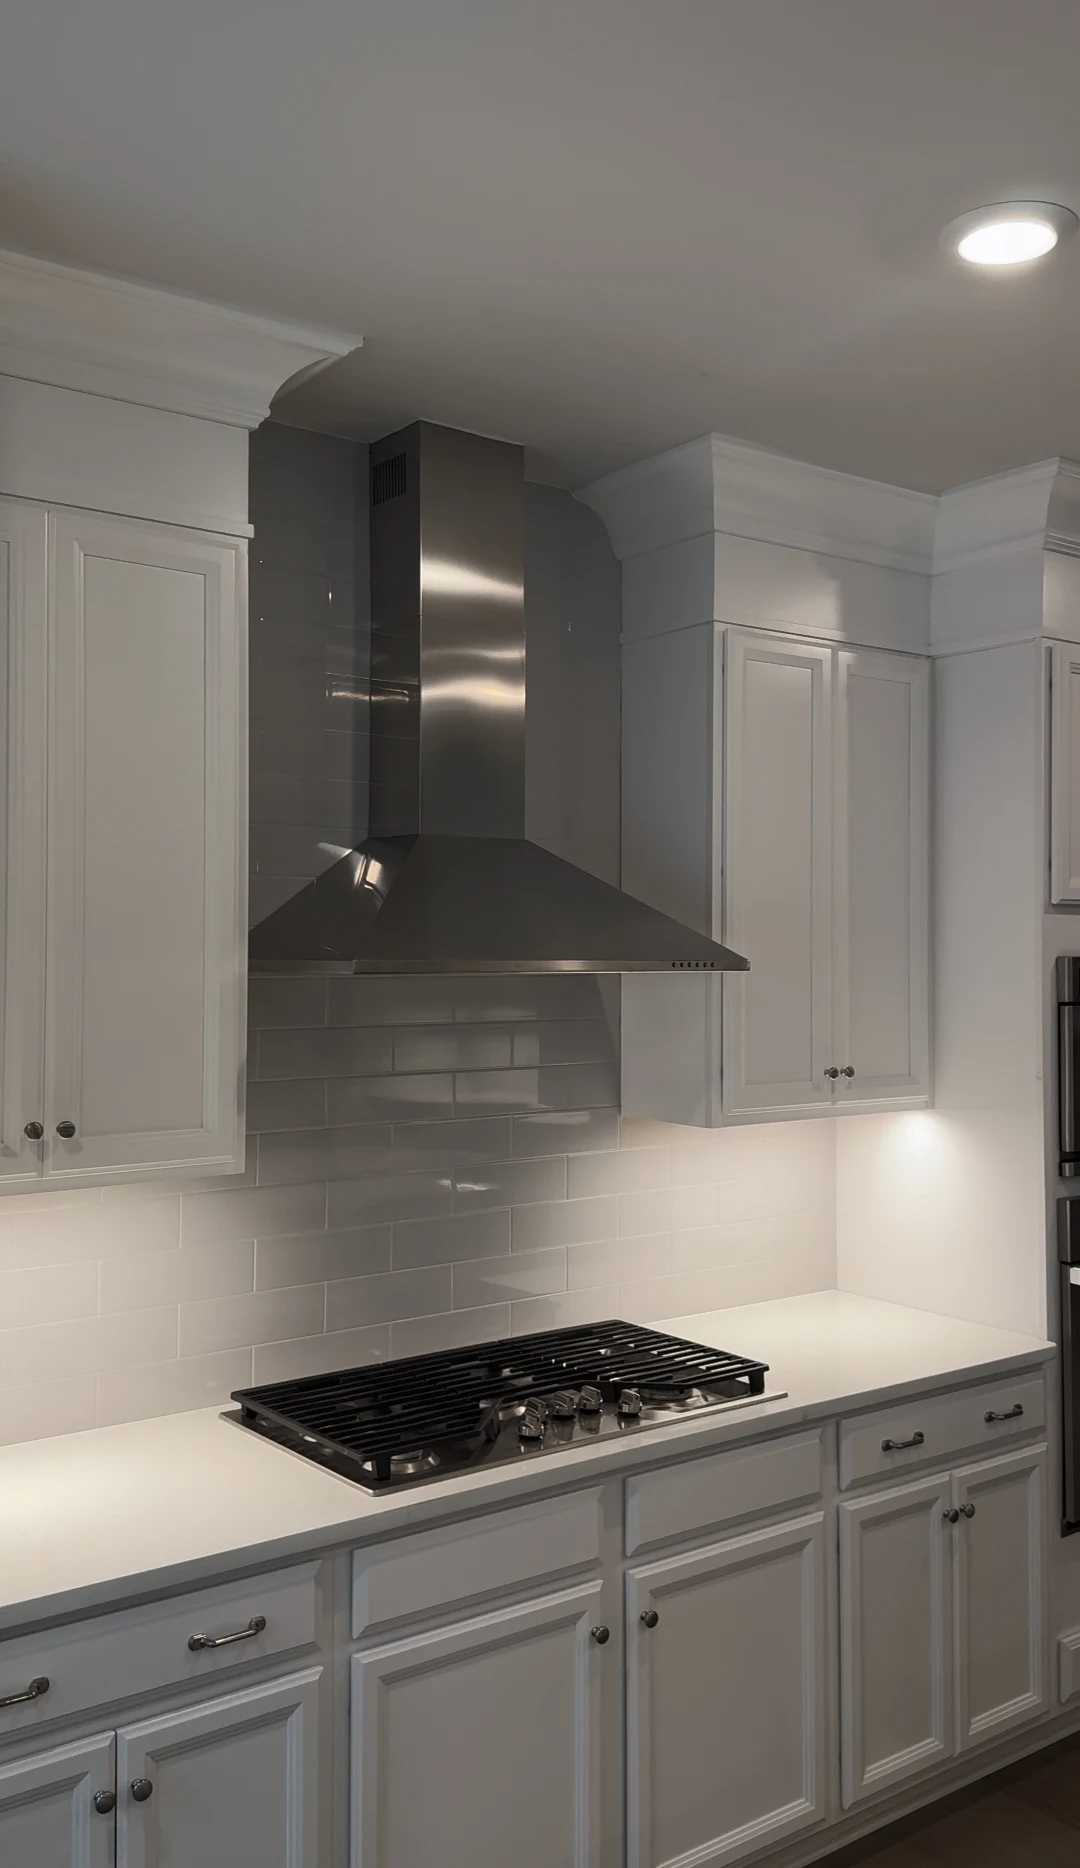
James handled the tile work. New grey subway tile was set from the countertop level — matching the height of the existing backsplash — and extended all the way up to the ceiling behind the range position. The full height extension is not merely aesthetic: running tile to ceiling eliminates the exposed drywall above the range, protects the wall from heat and splatter, and creates the visual sense of depth and height that makes a kitchen range area feel finished and intentional rather than incidental.
Tile adhesive was applied to the prepared substrate and each tile was set to consistent joint widths matching the existing installation. Once the adhesive cured, Alex applied color-matched grout across the full tile field. The grout was carefully worked into every joint and cleaned back so that no grout haze remained on the tile faces, and so the joint color was indistinguishable from the original backsplash grout running around the rest of the kitchen. No visible break line. No color mismatch.
Phase 3 — Custom Soffit Build and Installation
With the tile complete, the team built the custom soffit enclosure. This is the component that converts a visible duct cavity into a built-in range hood surround that looks like part of the original cabinetry design.
The soffit is a shop-fabricated plywood box: built to the precise dimensions required to house the range hood unit, then painted white in the shop to match the kitchen's existing white raised-panel cabinetry. On-site, the box was installed tight to the ceiling and positioned to align flush with the face of the adjacent cabinet runs. When installed, the range hood does not appear surface-mounted — it appears recessed into a purpose-built enclosure that was always part of the kitchen's design.
Achieving a tight, seamless fit at the ceiling line was a precision task. A gap between the soffit top and the ceiling reads immediately as an afterthought; a clean, tight joint reads as original construction. The ProBrothers crew hit the ceiling tight on all edges.
Phase 4 — Crown Moulding
Crown moulding was run across the top of the full cabinet run and around the soffit enclosure to create a finished termination at the ceiling line. The moulding bridges the transition between the vertical cabinet and soffit faces and the horizontal ceiling plane — it is what makes a cabinet run read as furniture-grade rather than as construction that stopped before it was done.
The corners and returns at the soffit junctions required careful coping and mitering to sit clean. The moulding profile was selected to match the scale of the existing kitchen and the height of the cabinet faces, so the addition reads as something that was always there.
Phase 5 — Range Installation and Final Cleanup
The new range was installed in the space below the soffit enclosure, wired for the appropriate service, and thoroughly tested for safe operation before signoff. Final paint touch-ups were applied to the surrounding walls and ceiling where demolition or installation had left marks, and the full site was cleaned — protection removed, countertops and appliances restored, floor swept — before handover.
Project Photos
Materials and Craftsmanship
- Matching Wall Tile — Grey subway tile selected to match the existing backsplash precisely. Tile selection for extensions like this requires matching not just the color and size but the surface profile (glossy vs. matte) and the grout joint dimension so the field reads uniformly across old and new tile.
- Tile Adhesive — Applied to the substrate after surface preparation to ensure a fully supported bond. Proper adhesive coverage is critical behind a range position where heat cycling over time can stress adhesive bonds that are partially bridged.
- Color-Matched Grout — Mixed and applied to match the existing grout color throughout the kitchen. Grout color is one of the few elements in a tile extension that can make or break the "was it always there" test — a slight hue difference is visible from across the room.
- Shop-Painted Custom Soffit — A plywood box built off-site and painted white to match the cabinetry before installation. Shop-finishing the soffit means the color match and finish quality are achieved under controlled conditions, then the unit is installed as a finished piece rather than painted in place under difficult access conditions.
- Crown Moulding — Premium profile run across the full cabinet and soffit run. Profile scale was matched to the existing kitchen context so the addition does not feel heavier or lighter than the surrounding millwork.
- Interior Paint — Touch-up application on surrounding walls and ceiling to erase any evidence of demolition or installation. This step is what makes the finished space look like nothing was ever disturbed.
Challenges and How We Solved Them
- Matching new tile to the existing backsplash without a visible break line. This was the highest-risk element of the project. Tile batches vary — even the same product can have slight color or texture variation between production runs, and grout color changes subtly with mix ratios and cure time. The ProBrothers team addressed this by sourcing tile that matched the existing installation as closely as possible, calibrating the grout mix to the existing joint color, and working the grout lines across both the old and new tile zones in a single consistent pass so the finished field reads uniformly. The result: no visible break line between the original backsplash and the new ceiling extension.
- Getting the soffit tight to the ceiling. A custom soffit box has to fit the specific geometry of the ceiling and the adjacent cabinet faces — no two kitchens are the same. The plywood box was built to precise measured dimensions, and the on-site fit was adjusted so the soffit sits flush against the ceiling on all edges with no visible gap. Getting this right requires patience: rushing the fit to close up faster invariably leaves the kind of hairline gap at the ceiling that makes the installation look like an add-on.
- Completing a multi-trade scope in three working days. This project combined demolition, drywall repair, tile work, custom carpentry, crown moulding installation, appliance wiring, and paint touch-ups — disciplines that normally span different crews and different scheduling blocks. The ProBrothers crew of Marsel, James, and Alex sequenced the work so that each phase cured or set while the next phase was active, with no waiting gaps that would have pushed the timeline to a fourth day. The homeowners got their kitchen back on schedule.
The Result
In three days, a visible gap in an otherwise well-finished kitchen became its most polished detail. The grey subway tile now runs unbroken from the countertop all the way to the ceiling behind the range. The range hood sits flush inside its purpose-built white surround, looking like it was part of the original kitchen design. Crown moulding caps the full cabinet run from wall to wall, creating the furniture-grade finish that makes a kitchen feel designed rather than assembled.
The transformation was dramatic in proportion to the scope: no full gut renovation, no disruption to the rest of the kitchen, no visible evidence of the work except the finished result. Three days and $10,000 closed the gap between a kitchen that was functionally complete and one that looks fully resolved.
"I'd been staring at that open duct cavity for two years. In three days Marsel's team tiled the whole wall, built the hood box, ran crown across the whole cabinet line, and left the kitchen cleaner than they found it. The new tile matches the old perfectly — I had to point out where the new section starts to show people. It looks like it was designed that way from day one."
Why It Matters for West Chester Homeowners
West Chester and the surrounding Chester County area have a high concentration of homes where the kitchen was well-built originally but has accumulated dated elements — exposed duct work, incomplete backsplash tile, range areas that never received their proper built-in treatment. A targeted upgrade like this one costs a fraction of a full kitchen remodel, delivers a disproportionate visual impact, and resolves the specific detail that makes an otherwise good kitchen look unfinished.
For homeowners in West Chester, Exton, Malvern, Paoli, or anywhere in Chester County who have a kitchen feature that was never properly finished — or a range position that needs a built-in hood enclosure — this project demonstrates what ProBrothers can deliver in a short, targeted engagement.
ProBrothers Construction serves homeowners throughout southeastern Pennsylvania, including Chester County, Delaware County, Montgomery County, and the Philadelphia suburbs.
Frequently Asked Questions
How much does a kitchen range hood installation and backsplash tile extension cost in West Chester, PA?
This West Chester project — custom soffit enclosure, floor-to-ceiling tile extension, crown moulding, and range installation — came in at $10,000 and was completed in 3 days. Costs vary based on the size of the range area, tile selection, and whether drywall repair is needed. ProBrothers provides free on-site estimates.
How long does it take to install a built-in range hood enclosure and extend tile to the ceiling?
This West Chester kitchen was completed in 3 days, covering demolition, drywall repair, tile installation, soffit build and install, crown moulding, range hookup, and paint touch-ups. Scope and site conditions affect the timeline, but ProBrothers crews are organized to minimize kitchen downtime.
Can you match existing backsplash tile when extending to the ceiling?
Yes — matching existing tile is a core part of this type of project. ProBrothers sources tile to match the existing backsplash in size, surface profile, and color, and mixes grout to match the existing joint color so the extension reads as seamless. In this West Chester project, there is no visible break line between the original tile and the new ceiling extension.
What is a custom soffit for a range hood?
A soffit is a custom-built enclosure — typically shop-fabricated plywood — that houses the range hood unit inside a box that aligns flush with the surrounding cabinetry and ceiling. It converts what would otherwise be a surface-mounted hood into a built-in element that appears to have been part of the original kitchen design. ProBrothers builds and paints the soffit to match the existing cabinetry color.
Does ProBrothers Construction do kitchen remodeling in West Chester and Chester County?
Yes. ProBrothers serves homeowners throughout southeastern Pennsylvania including West Chester, Exton, Malvern, Paoli, Berwyn, Wayne, and communities across Chester County, Delaware County, and Montgomery County. Contact us for a free in-home consultation.
Upgrade Your Kitchen in West Chester
ProBrothers serves West Chester, Exton, Malvern, Paoli, and communities throughout Chester County and southeastern Pennsylvania. Free in-home estimate within one business day.