
| Detail | Value |
|---|---|
| Location | Newtown Square, PA (Delaware County) |
| Service | Interior Trim, Decorative Wall Panels & Custom Cabinet Installation |
| Budget | $22,000 |
| Timeline | 2 weeks |
| Crew | Marsel, Vitaly, Alex |
Overview
This custom family room renovation in Newtown Square, Delaware County, was designed to completely transform an outdated living space into a modern, elegant, and highly functional room. The homeowners wanted to replace aging trim, an old fireplace mantel, and worn-out builder-grade finishes with premium custom cabinetry, decorative wall paneling, and fresh architectural details that would enhance both the aesthetics and the long-term value of the home.
ProBrothers' three-person crew — Marsel, Vitaly, and Alex — planned every stage carefully to ensure precision and minimal disruption to the household. The scope was ambitious: strip everything back to bare drywall, then rebuild from scratch with custom panels, cabinetry, trim, and a finishing standard normally achieved only in a controlled cabinet-shop environment — achieved here, in a lived-in home, in two weeks.
The Client's Goal
The Newtown Square homeowners had a family room that felt out of step with the quality of the rest of the house. The fireplace mantel was outdated. Baseboards and window casings were standard builder-grade. The plain drywall surfaces offered no architectural character.
Their goal was specific and demanding: make a bold design statement — the kind of polished, custom built-in look you see in high-end new construction — without a full gut renovation. Every wall was to feel intentional, every surface was to match, and the finish quality had to hold up to close inspection.
Scope of Work
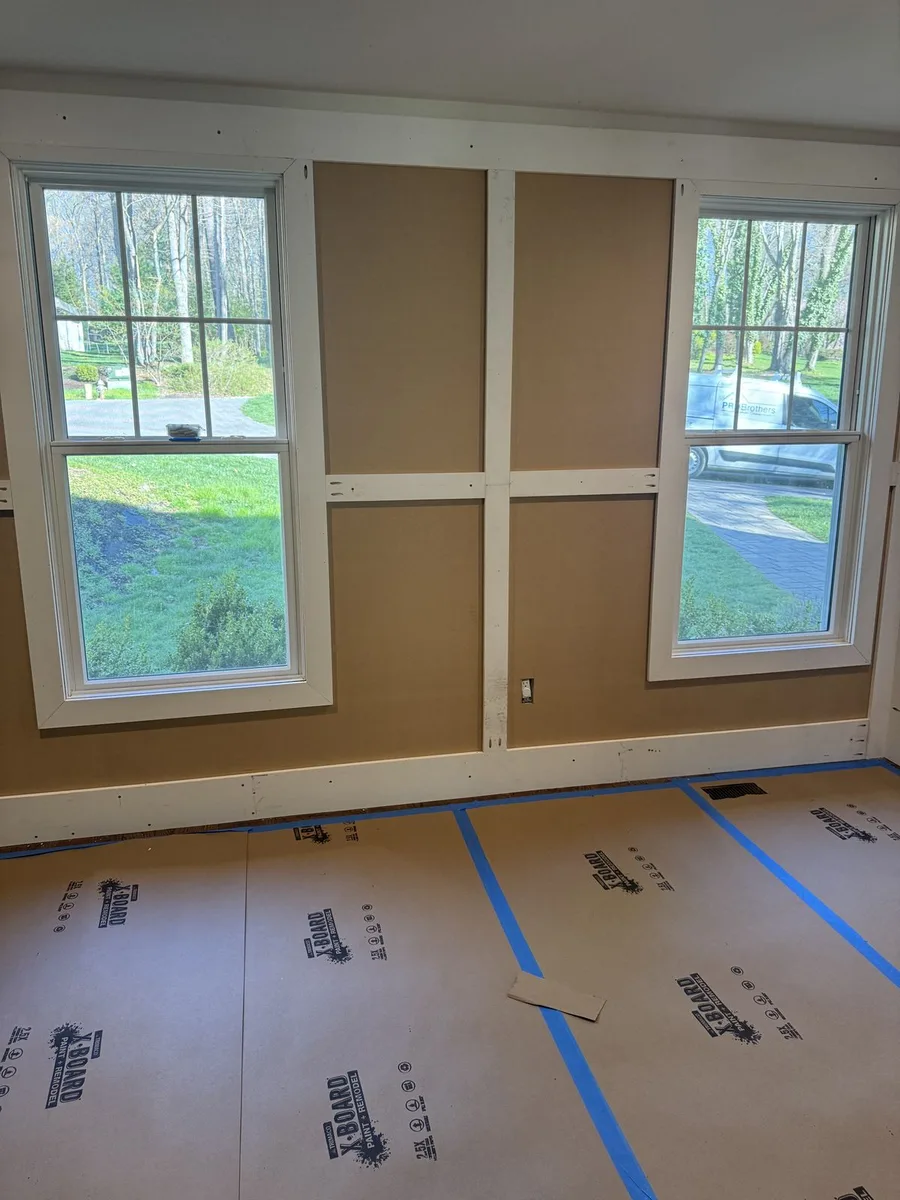
- Removed existing baseboards, window casings, picture frame trim, and the old fireplace mantel.
- Installed custom-built cabinetry along the walls.
- Installed decorative MDF wall paneling across all wall surfaces.
- Installed premium crown moulding throughout the entire room.
- Filled, sanded, and prepared all surfaces for finishing.
- Professionally spray-painted all cabinets, wall panels, and trim for a seamless, factory-quality finish.
- Painted and installed two new front doors as part of the same project.
- Completed final cleanup and carefully returned all furniture to its original position.
Step-by-Step Process
Phase 1 — Demo and Prep
ProBrothers craftsman Marsel led the teardown phase. Every piece of existing trim was removed cleanly: the baseboards that ran along the floor perimeter, the window casings framing each opening, the picture frame moulding on the walls, and the aging fireplace mantel that had dominated the focal wall. Removal was methodical — nothing pulled hard or carelessly — because the drywall underneath needed to be left in sound condition for the panels to sit flush against it.
Once the room was stripped back to bare walls, the team patched any drywall damage, filled fastener holes, and established a clean, level baseline across every surface. This prep phase is invisible in the final result but determines whether the panels sit flat and the trim reads crisp.
Phase 2 — Cabinetry Installation
With the walls clean, the crew installed the custom-built cabinets. These are not off-the-shelf units: they are built to the specific dimensions of the room, sized and positioned to create the unified built-in furniture look the homeowners requested. Cabinets went in first because all subsequent panel and trim work keys off them — the panels terminate into the cabinet faces, the crown moulding bridges between the cabinet tops and the ceiling, and the overall composition only reads as intentional if the cabinetry is set perfectly square and level.
Phase 3 — Decorative Wall Paneling
The signature element of this renovation was the decorative MDF wall paneling. Vitaly handled the panel fabrication and layout. Quarter-inch MDF sheets were cut into the geometric frame shapes that define the panel pattern, then installed across the full wall surfaces using primed 1×3 trim boards as the visible borders. The pattern was planned so that panels align with the cabinet faces, window casings, and crown — a single coherent system rather than elements that happen to coexist in the same room.
MDF is the right substrate for decorative paneling at this price point: it takes paint perfectly (no grain telegraphing through the paint film), machines cleanly to tight tolerances, and holds its shape over time when properly painted. The quarter-inch thickness allows panels to be built up with the 1×3 borders to create a satisfying depth — visible shadow lines that give the walls a three-dimensional character without making the room feel smaller.
Phase 4 — Crown Moulding
Alex ran the crown moulding continuously throughout the room, tying the panels, the cabinetry, the windows, and the ceiling into a single unified composition. Crown moulding is often treated as an optional embellishment. In a paneled-and-cabinet room like this one, it is structural to the design: it closes the gap between the top of the cabinet run and the ceiling, and it gives every wall element a proper terminus that reads as resolved rather than abandoned.
The corners required precise coping and mitering — each joint fitted by hand — so the moulding runs clean and tight at every transition. In a room of this scale, with multiple window returns and cabinet junctions, that means dozens of individual cuts, all of which have to be right.
Phase 5 — Surface Preparation and Finishing
Before any paint was applied, every joint was filled, every surface was sanded smooth, and every edge was inspected. This prep phase is what separates a professional installation from an amateur one. Spray-painting amplifies both good and bad surface prep: a high-quality spray finish on well-prepared surfaces looks like it came out of a factory; the same finish over rushed prep reveals every void and bump in sharp relief.
The entire installation — cabinets, panels, 1×3 borders, crown moulding, window casings — was spray-painted in premium interior paint in a single unified color. Spray application eliminates brush marks, lap lines, and the uneven sheen you get with roller-applied paint on complex profiles. The result is a surface that reads as one continuous, consistent material from floor to ceiling, regardless of how many different components make it up.
Phase 6 — Door Installation and Final Details
Two new front doors were painted and installed as the final phase of the project. Painting the doors in the same premium interior paint as the room's trim and panels extended the cohesive aesthetic from the family room through to the entry — a detail that makes the renovation read as intentional rather than isolated.
The crew completed a thorough final cleanup and returned all furniture to its original position so the homeowners could walk in and immediately enjoy the finished space.
Project Photos
Materials and Craftsmanship
The materials list for this project is short and deliberate:
- Crown Moulding — Run continuously throughout the room, this ties every vertical element to the ceiling in a single horizontal plane. Profile selection was matched to the scale of the room so the moulding reads proportionally correct — not too small to register, not so large it compresses the ceiling height.
- 1/4" MDF Sheets — The core of the decorative panel system. MDF's uniform composition means it machines cleanly, lies flat, and accepts paint without grain variation affecting the surface quality of the finish.
- Primed 1×3 Trim Boards — The visible borders of each panel frame. Primed stock takes paint immediately and provides a slightly raised surface edge that creates the shadow lines defining the panel geometry.
- Premium Interior Paint (Spray-Applied) — Not a standard wall paint applied with a brush. This is a high-build interior finish applied with professional spray equipment, building up to a consistent film thickness across every surface simultaneously. The spray method is what produces the factory appearance — no tool marks, no inconsistency in sheen, no brush drag on the moulding profiles.
- Custom-Built Cabinets — Built to the room's specific dimensions rather than sourced off a shelf. This is what allows them to sit flush against the panels and crown as though they were always part of the architecture.
Challenges and How We Solved Them
- Achieving a factory finish on-site. The defining challenge of this type of renovation is that a cabinet shop controls its environment: no dust, stable temperature, parts can be laid flat. ProBrothers brought that standard into a lived-in home by sequencing the work carefully — completing all filling and sanding before any spray equipment came out, controlling the spray environment, and building in sufficient dry time between prep and topcoat so the finish could cure without contamination.
- Integrating multiple systems into one coherent composition. Cabinets, panels, and crown moulding are three different installation disciplines. The challenge is making them read as one designed object rather than three things that happen to share a room. The ProBrothers crew resolved this by establishing the cabinet positions first, planning the panel layout to terminate properly into the cabinet faces, and running the crown as the unifying cap that bridges everything at the ceiling line.
- Matching the renovation to the home's existing finishes. The family room does not exist in isolation — the new installation had to complement the hardwood floors and the rest of the house's interior character. Color selection and moulding profile scale were both calibrated to the existing context so the renovation reads as an elevation of what was there, not a foreign object dropped into the space.
The Result
What had been a plain, builder-grade room became a space with genuine architectural presence. White custom built-ins frame the walls from floor to crown moulding; every surface is crisp and consistent; the warm oak hardwood floor now grounds a room that finally matches it in quality. Two renovated front doors extend the same elevated aesthetic through to the entry.
The project was completed on schedule, within the $22,000 budget, and to the level of finish where the most frequent question from guests is: "Was this original to the house?"
"We'd been looking at this room for years thinking it needed something, but we couldn't put our finger on what. Marsel and the team came in, took everything back to bare walls, and in two weeks gave us a room that looks like it was designed for the house from day one. The cabinets, the panels, the crown — it all fits together like one piece. I've had three neighbors ask me who built the built-ins."
Why It Matters for Newtown Square Homeowners
Newtown Square and the surrounding Delaware County communities contain substantial housing stock where interior finishes have not kept pace with the market value of the homes themselves. Builder-grade trim, standard baseboards, and plain drywall are common in homes that otherwise command premium prices. Custom wall panel and cabinet installations like this one close that gap — they add genuine architectural character, they are durable and maintenance-friendly once painted, and they increase the home's perceived and appraised value.
For homeowners in Newtown Square, Wayne, Berwyn, or anywhere in Delaware County considering a family room renovation, this project demonstrates what is achievable in two weeks at $22,000: a complete architectural transformation, not just a repaint.
ProBrothers Construction serves homeowners throughout southeastern Pennsylvania, including Delaware County, Chester County, Montgomery County, and the Philadelphia Main Line.
Frequently Asked Questions
How much does a custom wall panel and cabinet installation cost in Newtown Square, PA?
This Newtown Square project came in at $22,000 for a full family room renovation including custom MDF wall panels, built-in cabinetry, crown moulding, and professional spray finishing. Costs vary based on room size, panel complexity, and cabinet count. ProBrothers provides free on-site estimates.
How long does a custom wall panel and cabinet project take?
This Newtown Square family room — stripping all existing trim, installing custom cabinets, decorative MDF paneling, and crown moulding, and spray-finishing every surface — was completed in 2 weeks. Timeline depends on room size and scope, but ProBrothers crews are structured to minimize disruption and hit their schedule.
What materials are used for decorative wall paneling?
ProBrothers uses 1/4" MDF sheets for the panel frames and primed 1×3 trim boards for the visible borders. MDF is the industry standard for painted decorative panels because it machines cleanly, lies flat, and takes spray paint without grain or texture variation telegraphing through the finish.
Why is spray-painting better than brush or roller for this type of project?
Spray application builds an even film thickness across all surfaces simultaneously — no brush drag on moulding profiles, no lap lines, no variation in sheen between flat panels and curved edges. The result is a consistent, factory-quality finish that reads as one unified material rather than multiple painted components.
Does ProBrothers Construction serve West Chester, Wayne, and other Delaware County communities?
Yes. ProBrothers serves homeowners throughout southeastern Pennsylvania including Newtown Square, West Chester, Wayne, Berwyn, Malvern, Media, and communities across Delaware County, Chester County, and Montgomery County. Contact us for a free in-home estimate.
Start Your Family Room Renovation
ProBrothers serves Newtown Square, Media, Wayne, West Chester, and communities throughout southeastern Pennsylvania. Free on-site estimate within one business day.